The Rocket Project
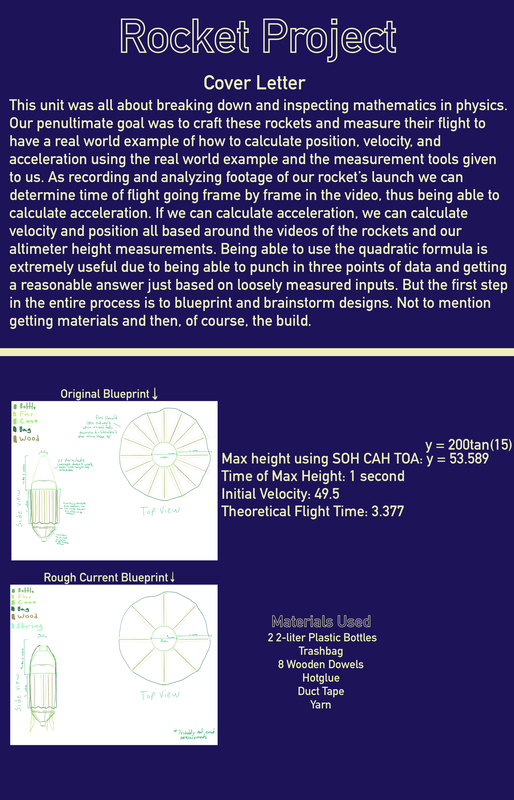
For the rocket project, we had the goal of creating a water and air propelled rocket. The requirements for the rocket were for it to be made from one or more plastic bottles, with at least one fin, a nose cone, and a working parachute. Many students also had the goal of making a rocket that could go as high as possible but we, Cooper and I, only hoped to have a rocket that fit the minimum requirements.
We chose to go a safe route by not splicing, however we experimented with the parachute design. The fins would serve as a skeleton for our parachute. The rocket turned out to have eight fins secured to the parachute with hot glue and splinted by wooden dowels, so I gave our rocket the name “Vampire Squid”.
As we built our rocket, we had to experiment a lot with the parachute to get it to work. It took us a few days but we ended up landing with a design that would have the parachute on the outside of the nose cone, the tip of each fin attached to the body by yarn, and the body weighed down towards the bottom with duct tape, washers, and red paint. With that decided design, the Vampire Squid had a working parachute, but did somersaults through the air when launched. The rocket wasn’t very aerodynamic and didn’t have fins that would stabilize its trajectory through the air, so we added stabilizers.
If anything, I’d recommend going a safe route with the rocket body. The challenge of a unique parachute design was entertaining, the greater focus of our design, but difficult. The end product was mostly trash bag, so I had nicknamed it the “Trashbag Squid”. Maybe go for a nicer looking material if that design would be used again.
In the end, our rocket worked but wasn’t greatly ideal. Its weight and poor aerodynamic shape disallowed it to reach an exceptional height. If I did this project again, I’d probably want to make the rocket more aerodynamic and lightweight, along with tweaking the parachute design if more time would be provided.
Cookies Project Final
An aspiring artist is sent to a craft store with a $20 allowance to buy sketchbooks. The artist’s favorite sketchbook company is about to go out of business, so they want to buy an amount of books that will last the longest. There are three size options; small, medium, and large, the artist doesn’t like the large sketchbooks because they won’t fit on their shelf. The small and medium are small enough to stack 10 into the shelf. The small sketchbooks cost $2 each and are filled up in 6 months, the medium cost $5 each and are filled up in 12 months.
What combination of small and medium sketchbooks will last the longest amount of time?
Max Items = 10
Allowance = There is a total of $20 to spend
Minimal Time = The goal is to find a solution that will last the longest, but the minimum should be 48 months (4 years)
Small Sketchbook = Lasts for 6 months and costs $2
Medium Sketchbook = Last for 12 months and costs $5.00
Solution
- Steps labeled
- Put the inequalities 2x + 5y </= 20 and x + y </= 10 into a graphing calculator
- Put 6x + 12y = m (m = months) into calculator
- Find the highest possible m inside of the feasible region
- Tables outlining all of your constraints
- Screenshot of your feasible region in desmos, and the link to your desmos graph
- A list of possible best solutions and profits for each.
- One sentence stating which solution is best.
Tessellation Final
Hexagons are the supreme storage shape, a bold but somewhat true statement. Circles are the actual shape that can hold the most material, but they aren’t ideal when it comes to multiple storage containers. Unlike polygons like the parallelogram or hexagon, an oval, the shapes that have infinite straight edges, cannot fit perfectly together without extra unused spaces. So, the next best thing would be as close to a circle as possible while fitting into a one-shape tessellation, the hexagon. An example of this type of material organization would be found in bees’ honeycomb, the most famous hexagonal tessellation. Bees, a species that rely on a mixture called honey as their main food source, need somewhere to make and store the liquid, and raise their young. These insects aren’t mathematicians or engineers, the honeycomb doesn’t start out being a hexagonal pattern. The honeycomb is made out of beeswax, the bees carve circular holes into it and over time the soft wax compresses into hexagons, which just happen to be the most ideal storage shape. Hexagons aren’t just used to store material, there are also instances where the shape is seen in insect eyes and cracked stone/dried mud.
A simple way to figure out if a triangle is the same as another should be obvious. If one has all of the data; side lengths, area, angles, the data should be the same for both. If one doesn’t have all of the data, there are a few options. One would either need at least two side lengths and one angle, or two angles and one side length. With either of these groups of data, the missing data of the triangle can be found. How to use the first option; the two side lengths will be touching and at least one will be included in the angle, remembering that all three of a triangle’s angles will add up to 360, the missing side length can be found therefore the other two angles and the area. The second option; two angles and one side length, at least one of these angles will include the given side length, add up the angles and subtract them from 360, the other side lengths can be found along with the area. Now that one has discovered whether two triangles are the exact same, one can easily discover if two are similar. To find whether two triangles are similar but not exactly the same, the same steps can be used and if each of the side lengths of one triangle can be multiples of one side of the other triangle, they’re similar.
A simple way to figure out if a triangle is the same as another should be obvious. If one has all of the data; side lengths, area, angles, the data should be the same for both. If one doesn’t have all of the data, there are a few options. One would either need at least two side lengths and one angle, or two angles and one side length. With either of these groups of data, the missing data of the triangle can be found. How to use the first option; the two side lengths will be touching and at least one will be included in the angle, remembering that all three of a triangle’s angles will add up to 360, the missing side length can be found therefore the other two angles and the area. The second option; two angles and one side length, at least one of these angles will include the given side length, add up the angles and subtract them from 360, the other side lengths can be found along with the area. Now that one has discovered whether two triangles are the exact same, one can easily discover if two are similar. To find whether two triangles are similar but not exactly the same, the same steps can be used and if each of the side lengths of one triangle can be multiples of one side of the other triangle, they’re similar.
